Site Admin Guide
A guide for Site Admins who manage a FrontFlow kiosk location.
This guide is for Site Admins who manage a FrontFlow kiosk location. Site Admins can configure the site branding, manage the employees shown on the kiosk, and maintain the check-in experience for visitors.
FrontFlow sends transactional visitor arrival SMS alerts to employees or providers when a visitor checks in at the kiosk. Employees/providers are not FrontFlow users and do not log in.
Site Admin Responsibilities
As a Site Admin, you are responsible for:
- Keeping site branding accurate.
- Keeping employee names, photos, and mobile numbers current.
- Obtaining express written consent from each employee/provider before adding or using their mobile number for SMS alerts.
- Setting up a kiosk unlock code so the kiosk page is not publicly usable by anyone who finds the URL.
- Using MFA on your admin account.
- Reviewing employees regularly and disabling people who should not appear on the kiosk.
- Marking employees out of office for days when they should not receive visitor check-ins.
First-Time Setup Checklist
- Log in to the admin portal.
- Set up TOTP MFA on your admin account.
- Configure site branding.
- Upload the company logo.
- Set the site’s local time zone.
- Set the welcome message.
- Set the default consent message if your site uses provider-specific consent.
- Create a kiosk unlock code.
- Add employees or providers.
- Confirm express written consent has been obtained before entering or updating an employee/provider mobile number.
- Test the kiosk on the iPad before using it with visitors.
Account Security
Use MFA
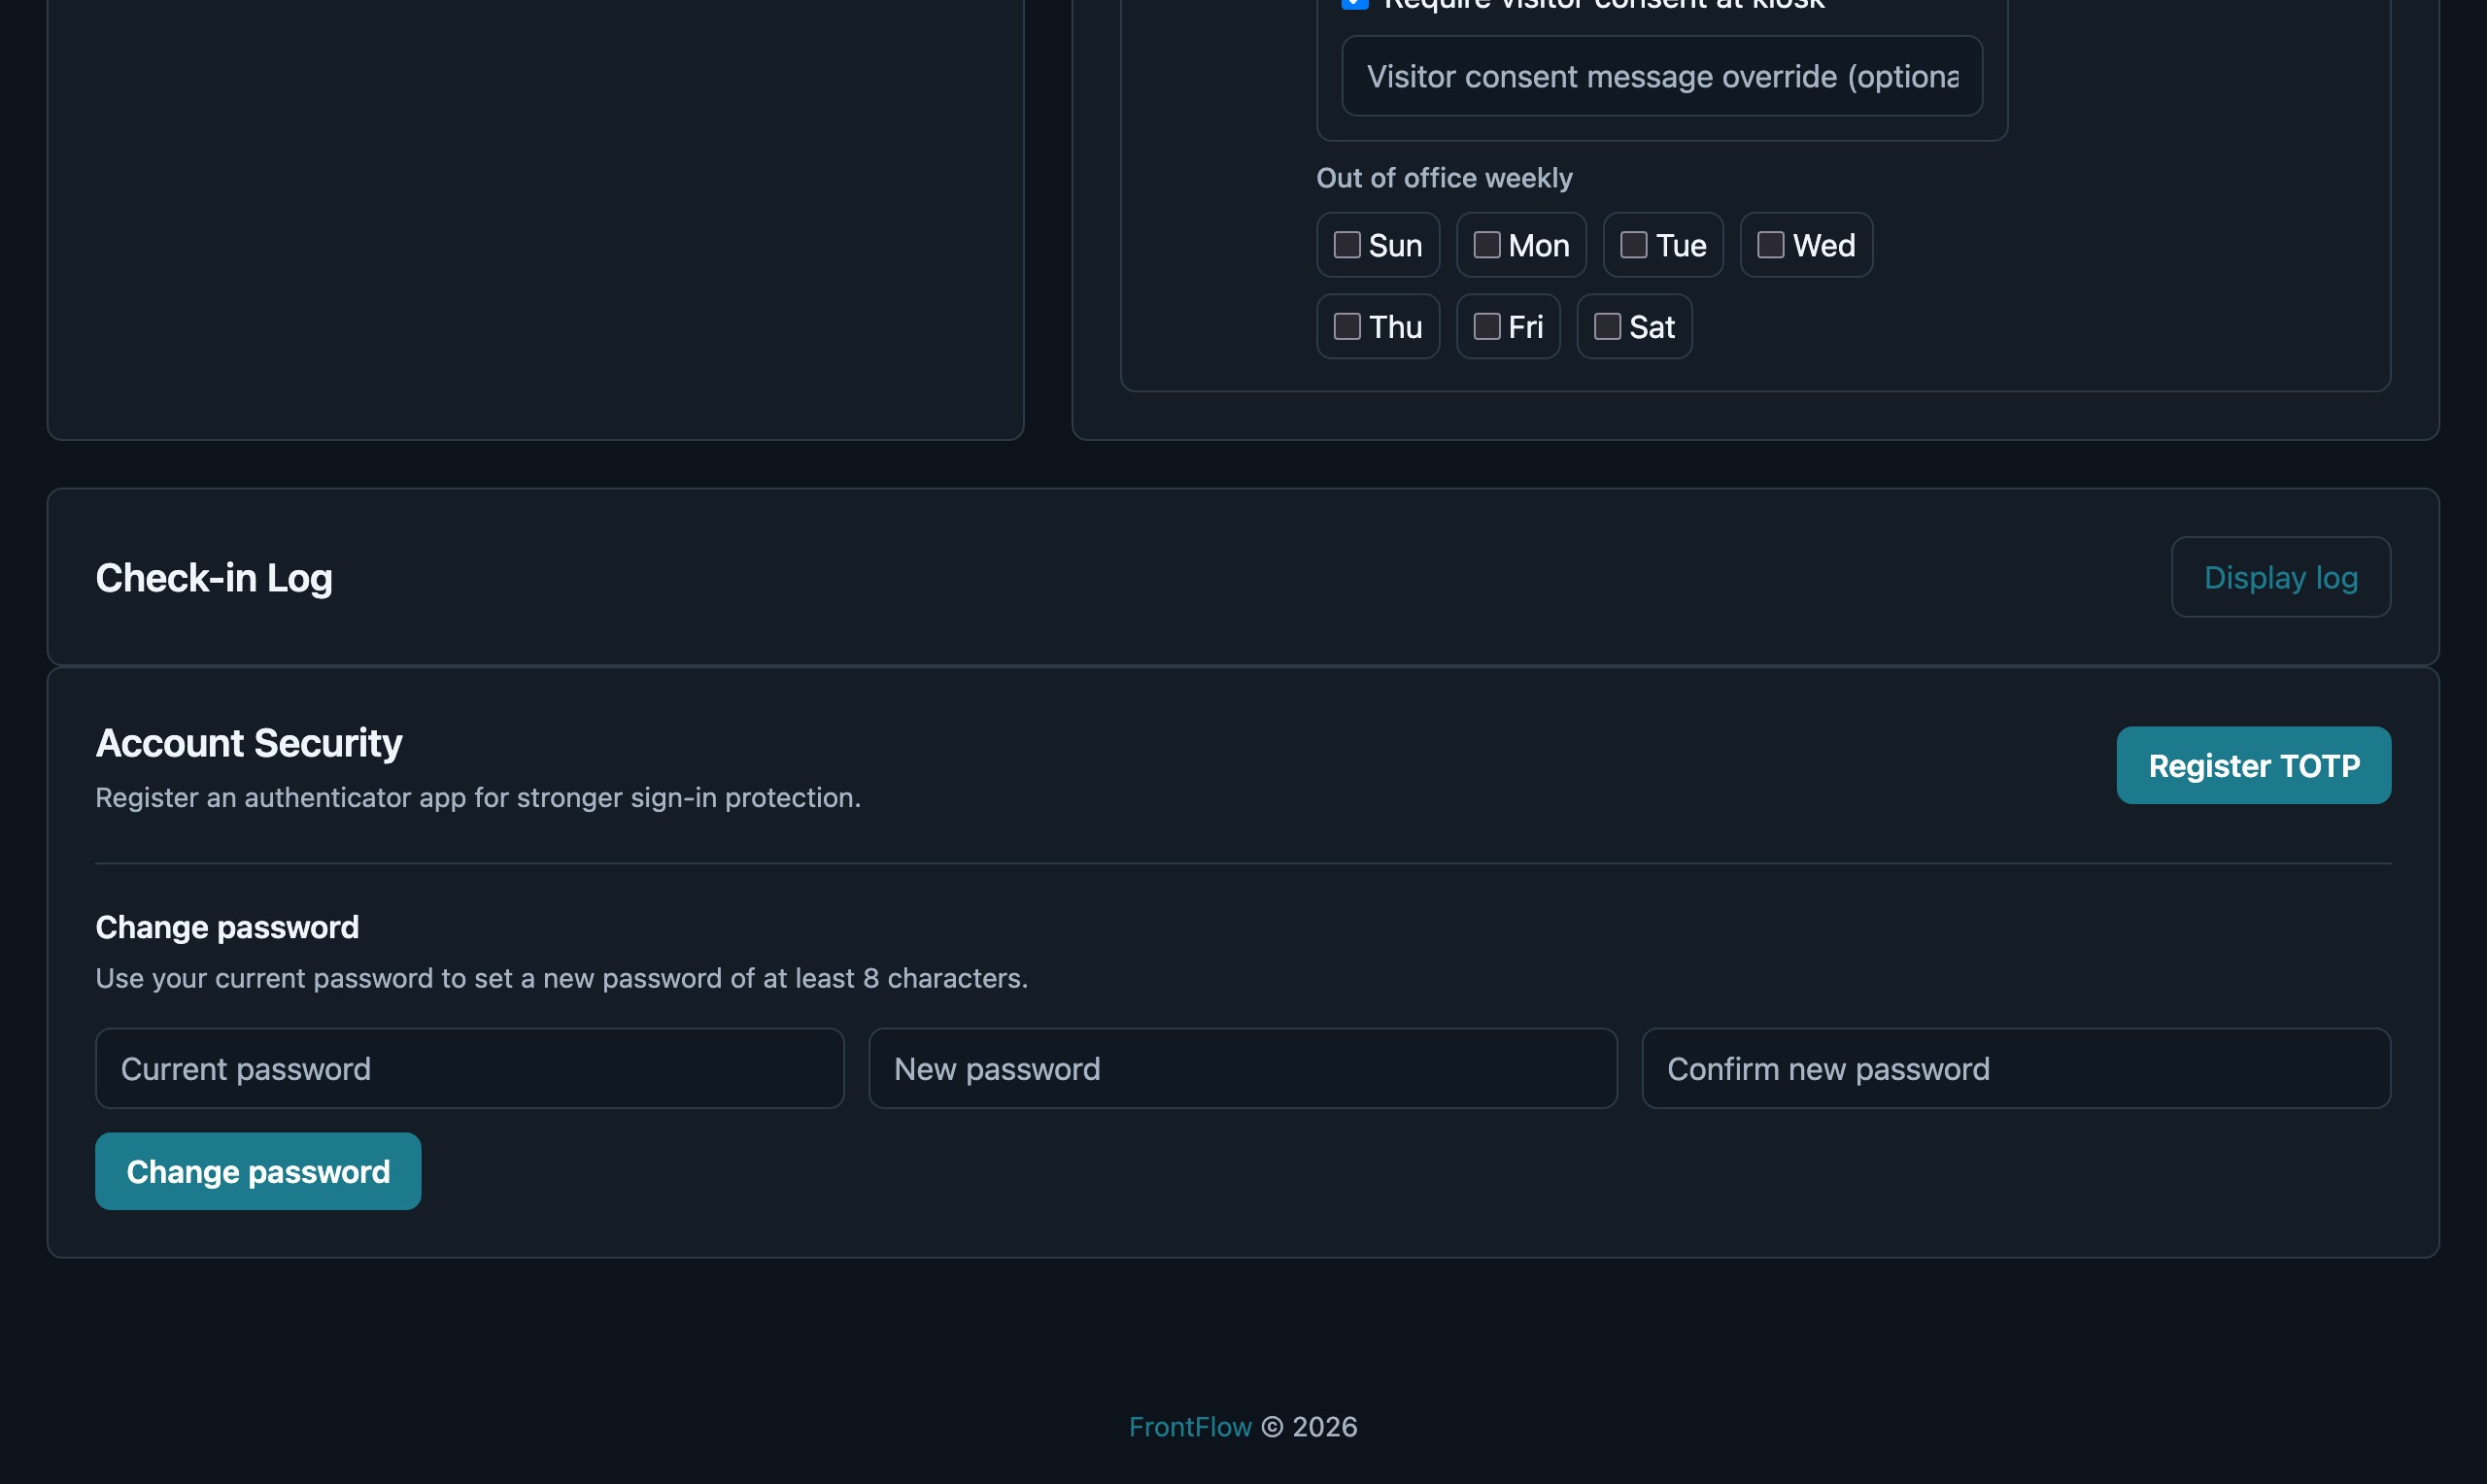
Each Site Admin should register TOTP MFA from the Account Security area. Use an authenticator app such as 1Password, Apple Passwords, Google Authenticator, Microsoft Authenticator, or another TOTP-compatible app.
Best practices:
- Do not share admin accounts.
- Each person who manages the site should have their own admin login.
- Enable MFA before managing real employee or visitor data.
- Contact a Master Admin if you lose access to MFA.
Change your password
Site Admins can change their own password from the Account Security panel. Enter the current password, a new password of at least eight characters, and the matching confirmation, then select Change password. This does not change MFA enrollment. Account Security is intentionally located below the site-management tools because it is used less often than daily kiosk administration.
Site Branding
Use the branding settings to make the kiosk recognizable to visitors.
Recommended setup:
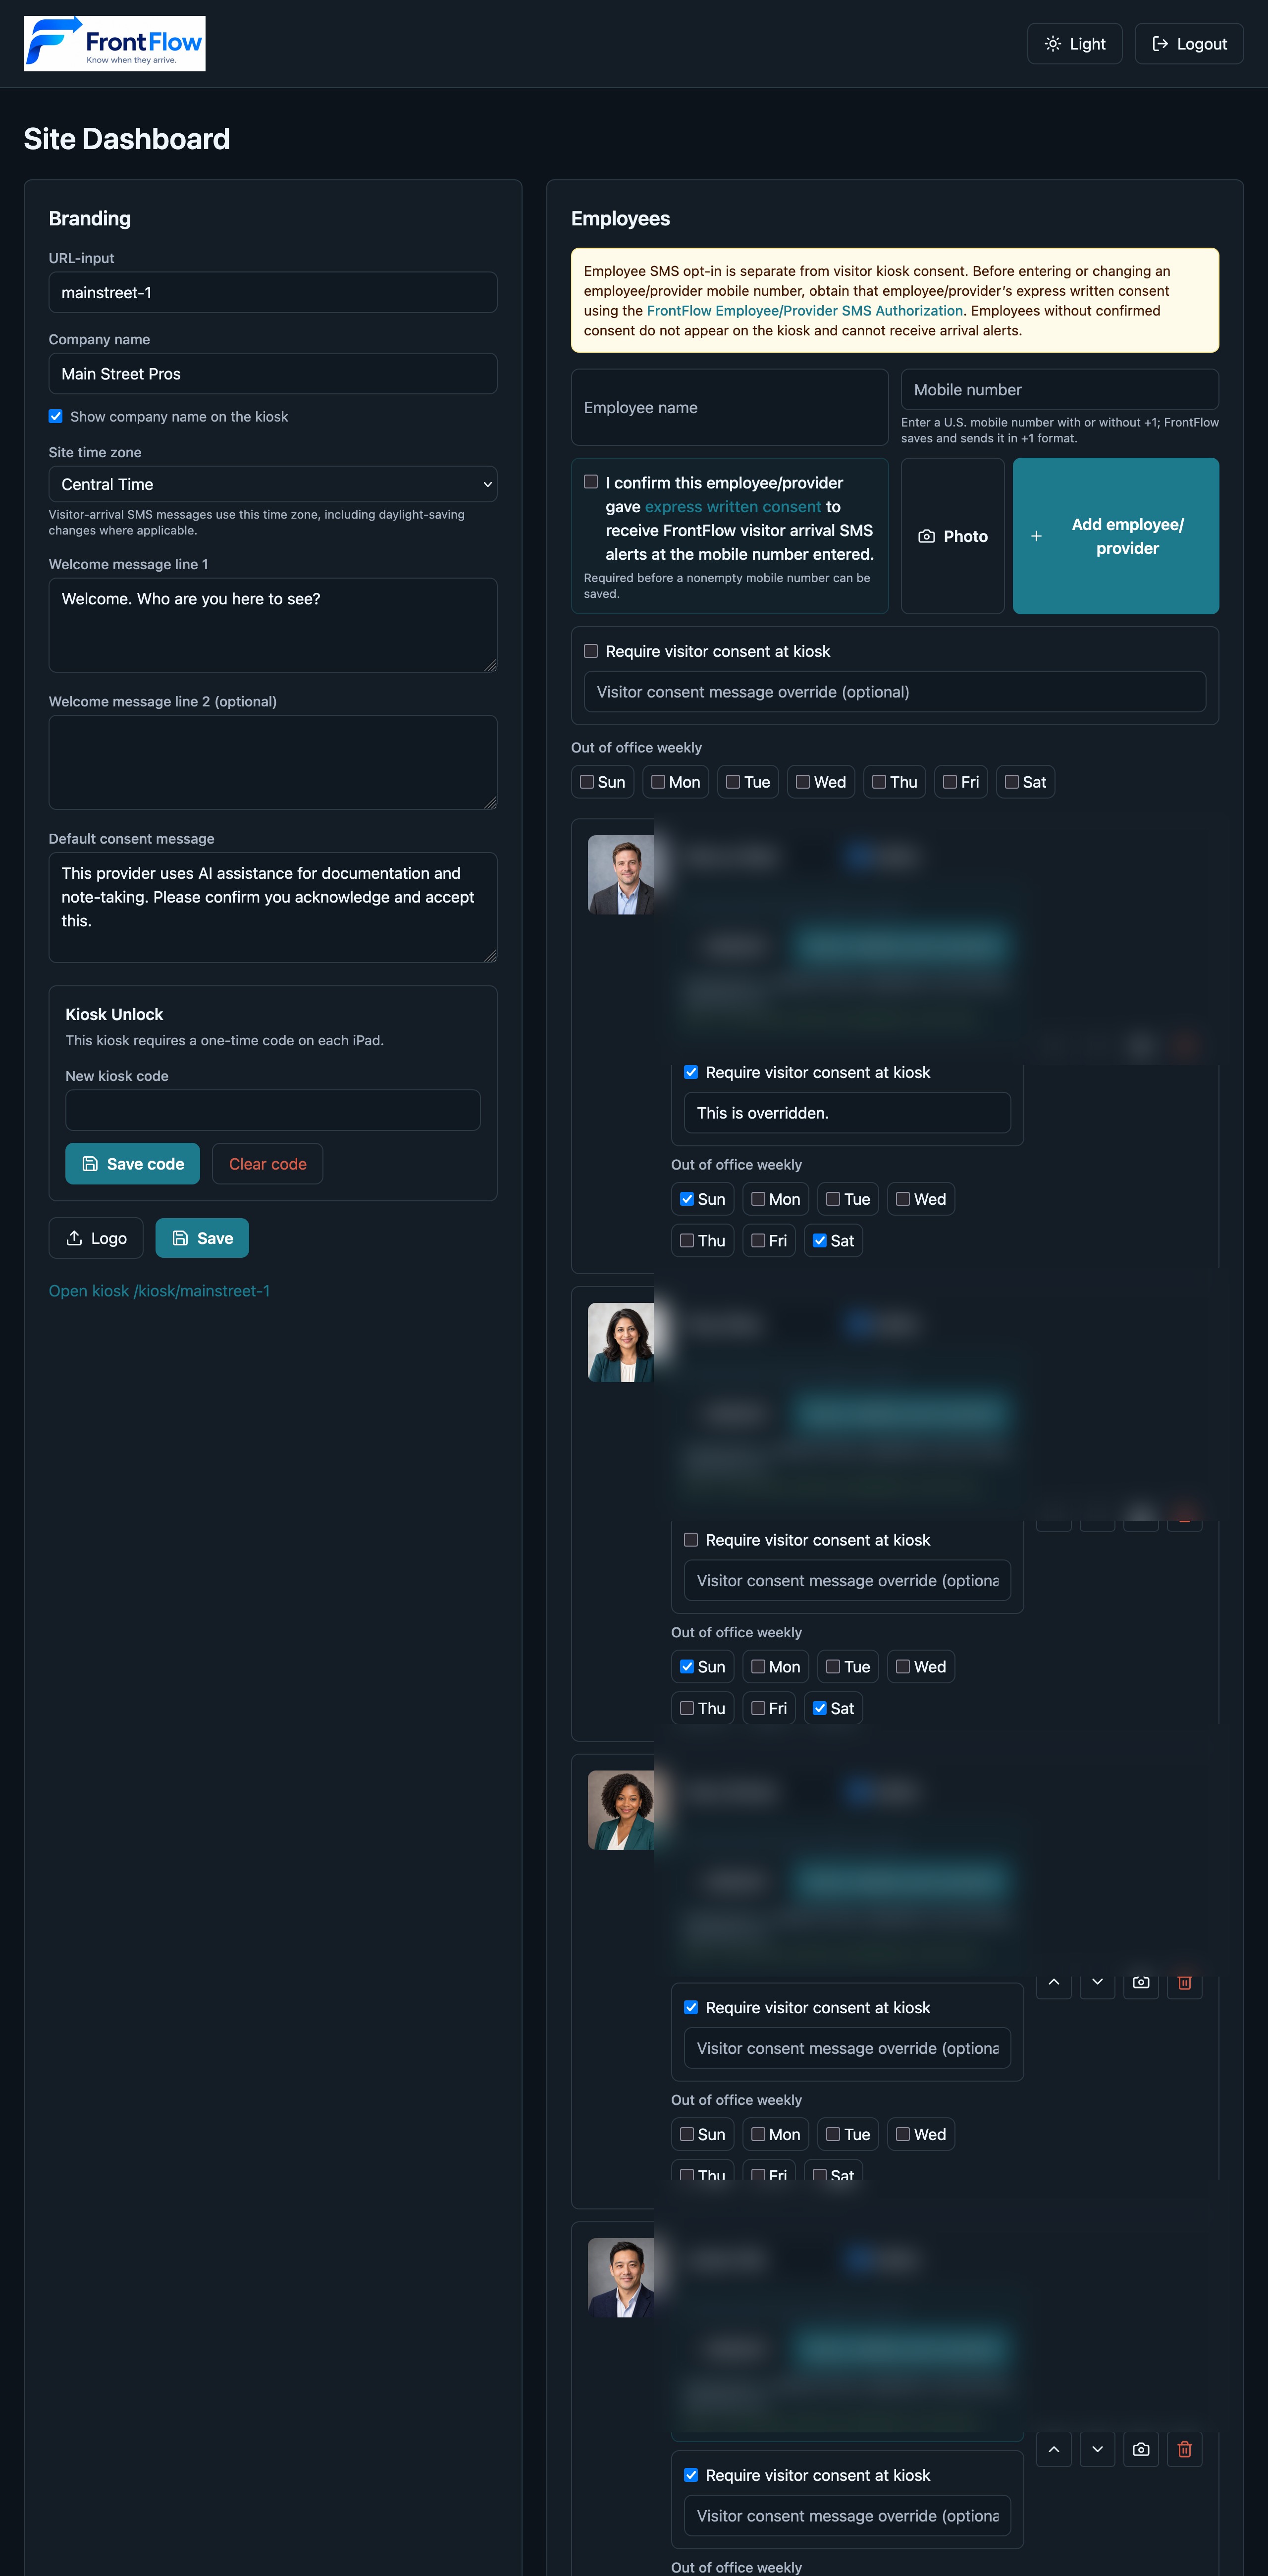
- Company name: Use the public-facing name visitors recognize.
- Show company name on the kiosk: Leave this selected to show the name beside the logo. Clear it when the logo already contains the desired name or when a logo-only kiosk header is preferred.
- Site time zone: Select the time zone at the physical site. Visitor-arrival SMS messages and out-of-office day availability follow this setting. New and existing sites default to Central Time until a Site Admin changes it.
- Logo: Use a clear logo with good contrast.
- Welcome message line 1: Keep it short and direct, such as
Welcome. Who are you here to see? - Welcome message line 2: Optional. Use it for a translated or supplemental welcome message, such as Spanish beneath an English first line. It appears directly below line 1 on the kiosk.
- Default consent message: Use approved language for your organization when an employee requires consent.
Logo tips:
- Use PNG or JPEG.
- For provider photos, upload a square image whenever possible. FrontFlow uses square card areas on the kiosk.
- Avoid tiny logos with lots of small text.
- Use a version that looks good on both light and dark kiosk backgrounds.
- Confirm the logo is readable on the iPad after upload.
Kiosk Unlock Code
The kiosk unlock code is intended to prevent someone from finding the kiosk URL and submitting remote check-ins.
How it works:
- Set a kiosk unlock code in the site settings.
- Open the kiosk page on the iPad.
- Enter the code once on that iPad.
- The iPad stays trusted using a long-lived secure browser cookie.
- Changing or clearing the kiosk code invalidates existing kiosk unlock sessions for that site.
Best practices:
- Always set a kiosk unlock code before using FrontFlow in a real location.
- Use a code that staff can enter but visitors would not guess.
- Do not post the code near the kiosk.
- Change the code if the iPad is lost, replaced, or used by unauthorized people.
- Test the kiosk after changing the code.
Employee Setup
Employees are the people who appear on the kiosk and receive arrival alerts. They are not admin users.
Required fields:
- Employee name
- Mobile number
- Active/inactive status
- Display order
Optional fields:
- Photo
- Consent required
- Consent message override
- Out-of-office weekly days
SMS Permission Requirement
Before entering or updating an employee/provider mobile number, the Site Admin is responsible for obtaining express written consent from that employee/provider to receive FrontFlow SMS arrival alerts.
After obtaining the authorization, select the checkbox confirming that the employee/provider gave express written consent to receive FrontFlow visitor arrival SMS alerts at the mobile number entered before saving the record.
The employee should understand:
- Their mobile number will be used to receive visitor arrival alerts.
- Messages are transactional and related to visitor check-ins.
- Message frequency depends on visitor arrivals.
- Message and data rates may apply.
- They may reply STOP to opt out or HELP for assistance.
Do not add a personal mobile number unless the employee has agreed to receive these messages.
Mobile Number Format
For United States numbers, enter either the 10-digit number or the E.164 form:
5551234567
+15551234567
FrontFlow stores and sends U.S. numbers in +1 format. Re-entering the same
underlying number with different formatting does not require renewed consent;
a genuinely different number does. Check the number carefully because an
incorrect number may send arrival alerts to the wrong person.
Employee Photos
Photos help visitors choose the right employee quickly.
Best practices:
- Use a clear headshot or professional profile image.
- Upload a square image whenever possible. FrontFlow displays photos in square kiosk card areas.
- Avoid group photos.
- Avoid very wide or very tall images when possible.
- Check the kiosk after uploading to confirm the face is visible.
- Replace outdated photos when roles or staff change.
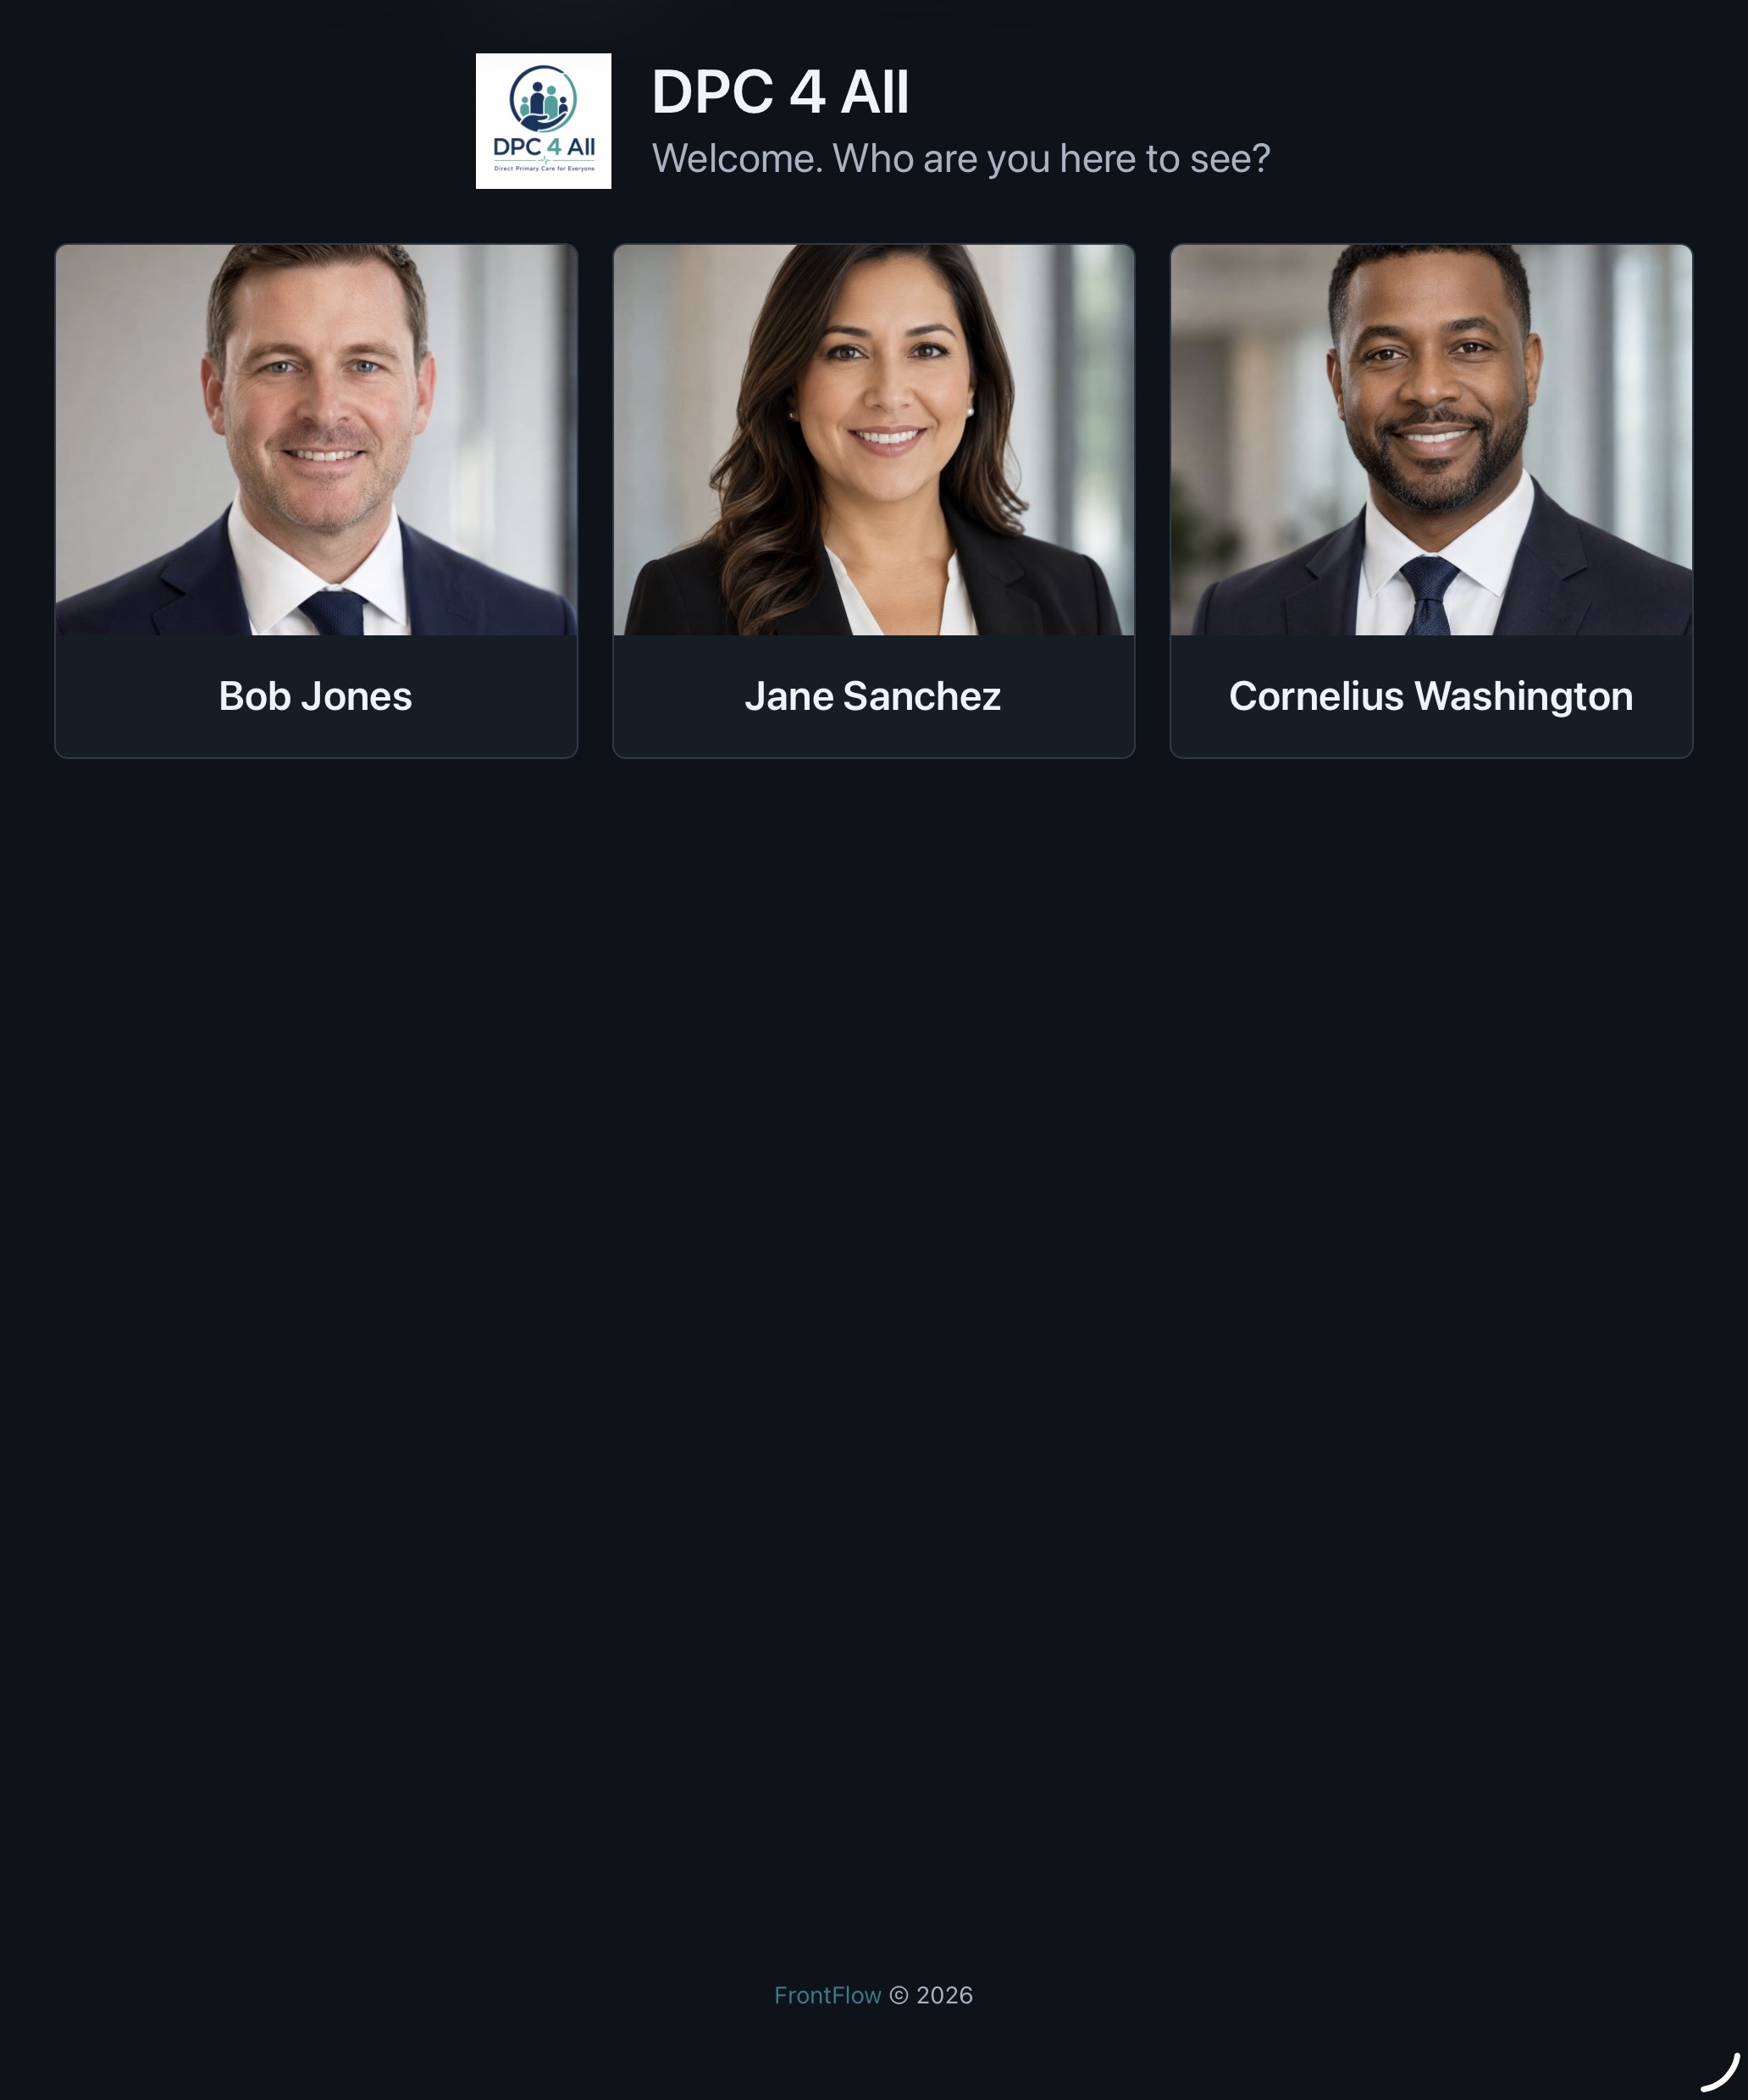
Kiosk cards use square image areas and crop images to fill them. Use a centered image where the employee’s face is near the middle. On an iPad in portrait orientation, FrontFlow is designed to show three provider cards across.
Display Order
Use display order to control how employees appear on the kiosk.
FrontFlow sorts people by display order first and then by name when two people have the same display order. Use the up/down controls in the employee editor to place the most frequently selected providers first.
Recommended approaches:
- Put the most commonly visited providers near the top.
- Group related providers together.
- Keep inactive or rarely used entries disabled rather than leaving them at the bottom.
Active and Inactive Employees
Only active employees appear on the kiosk.
Set an employee inactive when:
- They no longer work at the site.
- They should temporarily stop receiving visitor alerts.
- Their mobile number has not yet been verified.
- You are waiting for SMS permission.
Deleting an employee or provider
Deleting an employee/provider permanently removes that person and their related check-in history. FrontFlow shows a confirmation that names this consequence. Use Inactive instead when the person may return or when their history must remain available.
Out-of-Office Days
Use the out-of-office weekly settings when an employee is regularly unavailable on specific days.
When an employee is out of office for the current day, FrontFlow removes them from the kiosk for that day.
Examples:
- A provider does not work Fridays.
- A part-time employee only works Monday through Wednesday.
- A specialist is never available on weekends.
Consent Settings
Some employees may require visitor consent before the arrival alert is sent.
If consent is required for an employee:
- The visitor must acknowledge the consent message before submitting.
- The check-in record stores the consent message used at that time.
- The employee can use the site default consent message or an employee-specific override.
Use consent settings only when your organization has approved the consent language.
Example consent message:
This provider uses AI assistance for documentation and note-taking. Please confirm you acknowledge and accept this.
Testing the Kiosk
Before putting the iPad in front of visitors:
- Open the kiosk URL on the iPad.
- Enter the kiosk unlock code.
- Confirm the logo, company name, and welcome message are correct.
- Confirm only active and available employees appear.
- Submit a test check-in for one employee.
- Confirm the employee receives the SMS alert.
- Confirm the success screen appears and returns to the kiosk home.
- If consent is required, confirm the consent message appears and must be acknowledged.
Locking an iPad in kiosk mode
For a single iPad, use Apple’s Guided Access feature to keep visitors in Safari on the FrontFlow kiosk page. This does not require additional software.
- Open Settings on the iPad.
- Go to Accessibility > Guided Access.
- Turn on Guided Access and set a passcode used to exit the session.
- Open Safari and navigate to the correct FrontFlow kiosk URL.
- Triple-click the Home button. On iPads without a Home button, triple-click the Side or Top button.
- Adjust Guided Access options if needed, then select Start.
Additional tips:
- Disable Sleep/Wake and Volume buttons if staff do not need them.
- Before starting the session, set Settings > Display & Brightness > Auto-Lock to Never if the kiosk should stay awake.
- Keep the Guided Access passcode private and test exiting the session before leaving the kiosk in service.
Guided Access must be configured locally on each iPad. For larger deployments, consider mobile-device-management software that can apply kiosk settings remotely.
Ongoing Operations
Review the site regularly:
- Confirm employee mobile numbers are current.
- Remove or disable departed employees.
- Confirm express written consent has been obtained before adding or updating employee/provider numbers.
- Keep photos and display order current.
- Update out-of-office days when schedules change.
- Rotate the kiosk unlock code when staff or device access changes.
- Keep MFA enabled on all admin accounts.
Privacy and Security Practices
- Do not display or share employee mobile numbers publicly.
- Do not let visitors access the admin portal.
- Keep the iPad physically controlled by the business.
- Use the kiosk unlock code on each kiosk device.
- Lock the iPad to the kiosk page when possible.
- Do not share Site Admin credentials.
- Report suspicious check-ins or unexpected SMS behavior to a Master Admin.
When to Contact a Master Admin
Contact a Master Admin when:
- You need access to an additional site.
- You need a new Site Admin account.
- You lose MFA access.
- SMS alerts stop sending.
- The kiosk URL or unlock code needs to be reset urgently.
- A site should be deactivated.
- You suspect unauthorized access or misuse.